
Kp helps describe geomagnetic activity; it cannot tell you, by itself, whether you will see an aurora from your spot. Use it to choose what to check next: the dated forecast, the auroral map, and your local sky. Keep the space-weather outlook separate from the conditions you can inspect on arrival.
What does the Kp number describe?
NOAA's Planetary K-index page describes magnetic-field disturbances. Its estimated planetary Kp chart uses ground magnetometers and a three-hour index. Although the chart refreshes every minute, that does not turn the quantity into a one-minute local aurora measurement.
First identify whether the number in front of you is an estimate for an observed interval or a forecast for a future interval. Write down the named product and its dated time range. A screenshot cropped to one large number leaves you unable to check which period it describes.
Choose the product for the planning stage
NOAA's 3-Day Forecast puts recently observed conditions and future expectations in the same product. Read the correct section and its rationale, rather than treating everything on the page as a prediction.
| Product | How to use it |
|---|---|
| Estimated planetary Kp | Identify the activity interval being estimated. Keep that context when comparing it with a forecast. |
| 3-Day Forecast | Shortlist an interval to recheck. Retain the issue date, valid dates, and forecaster's explanation. |
| Aurora — 30 Minute Forecast | Check the relevant hemisphere and displayed time before comparing the modeled oval with your available view. |
The short-term aurora product uses the OVATION model for auroral location and intensity. NOAA describes a usual lead of 30–90 minutes, set by solar-wind travel from the upstream L1 observation point. When unavailable or contaminated solar-wind data require a current-Kp fallback, there is no forecast lead time.
Do not read the product's name as a promise of exactly thirty minutes' warning. Check the actual frame time and available status information. If the input state or valid time is unclear, mark it unknown and recheck the source. An animation can contain older frames; make sure the frame you use answers your current planning question.
Check the view from your spot
NOAA's aurora-viewing guidance says Kp-to-latitude relationships are approximate averages and use geomagnetic latitude, not geographic latitude. Its guidance also emphasizes darkness, local light, and the available poleward view. These are reasons to inspect the map and the site instead of applying one universal Kp cutoff.
Put a separate weather check beside the space-weather information. Use the cloud-planning guide to compare the intended hours and direction. Use your horizon record to identify obstructions from the actual setup position. A favorable space-weather entry does not finish either task.
Prepare a practical viewing checklist
Use these checkpoints before committing your available time. They organize the evidence; they do not calculate a personal probability of seeing aurora.
- Name the goal. Choose visual watching, photography, or both. Keep what you see and what a camera records as separate results.
- Match the date and time. Keep the source's UTC labels with the local date and time at your spot. For an overnight session, use the time-zone worksheet rather than a clock-only note.
- Read the whole product. Retain the issue time, valid interval, hemisphere, legend, and relevant qualifications. Do not compare a past frame with a future forecast as though they described the same instant.
- Check the site. Note the planned view, obstructions, local light, darkness, and cloud outlook. Confirm access and a practical stop time independently.
- Recheck before setup. Review the latest applicable information and the actual view. If something changed, record what changed and which part of the plan it affects.
Decide what to check next
| What you find | Useful next step |
|---|---|
| A promising number, but no dated interval | Open the original product and recover its time context before using it. |
| The selected frame falls outside your session | Find an applicable frame or forecast and keep the mismatch visible in your notes. |
| The local view is obstructed or conditions are uncertain | Reassess the actual setup and available time. Keep a fallback rather than letting the Kp number settle the decision. |
| The checks align with an available observing opportunity | Set a recheck and stop time, then assess what is actually visible without promising a result. |
Copy a short planning record
Keep these blank fields with your own observations. This is a proposed workflow, not a report of a successful aurora session.
- Plan: date, private spot reference, goal, local zone, observing interval, and stop time.
- Evidence: product URLs, issue/check times, valid intervals, selected frame, hemisphere, and unresolved fields.
- Local checks: darkness, Moon, clouds, view, access, and changes found on arrival.
- Outcome: timed visual notes, separate photo filenames if used, decision, and next check.
Bring the local conditions together
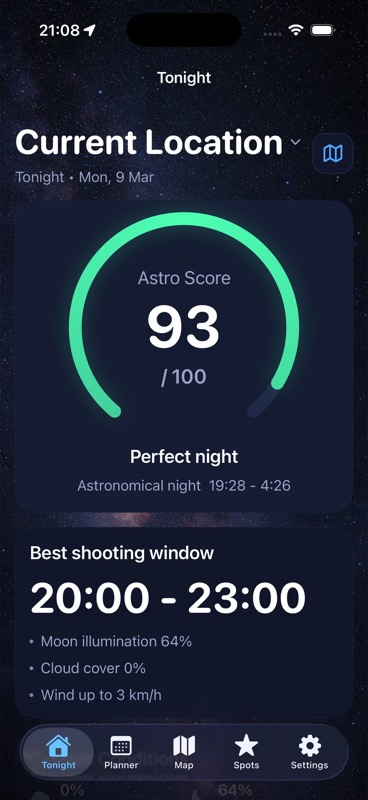
DarkScout helps organize Moon, cloud, darkness, and saved-spot planning. Keep the specialist space-weather products beside that local plan. The example Tonight screen above shows ordinary planning context; its score is not an aurora probability.
The current App Store listing offers DarkScout free for iPhone, requiring iOS 26 or later.
Keep your observing spot and sky conditions in one plan.
Check the local Moon and cloud context alongside your chosen aurora sources.
Get DarkScout for iPhone All features free · iOS 26 or laterSources and further reading
Primary product documentation and public app information checked November 16, 2026. This guide does not report a current geomagnetic event or a local aurora forecast.